How to Build a Lean-To Shed: Create a Simple Outdoor Storage Shed

How to Build a Lean-To Shed: Create a Simple Outdoor Storage Shed

Building Your Own Lean-To Shed: A Simple Guide to Outdoor Storage

Tired of garden clutter and overflowing toolboxes? A lean-to shed offers a straightforward solution for adding valuable outdoor storage space without the complexity of a freestanding structure. This guide walks you through building your own lean-to shed, providing a step-by-step process suitable for DIY enthusiasts of all skill levels. Get ready to reclaim your yard and organize your belongings!

Planning Your Lean-To Shed

Before you grab your tools, careful planning ensures a successful project. First, choose a suitable location. Consider proximity to an existing structure (your house, garage, or fence) for support and weather protection. Next, determine the desired dimensions. A smaller shed is easier to build, but plan for sufficient space to store your items. Finally, check local building codes and regulations to ensure your shed complies with local ordinances.

Materials You'll Need

Gather these essential materials before you begin. Remember to adjust quantities based on your shed's dimensions:

  • Pressure-treated lumber for the frame (posts, rafters, and supports)
  • Plywood or OSB sheeting for the walls and roof
  • Roofing material (e.g., asphalt shingles, metal roofing)
  • Concrete or pressure-treated wood for the foundation
  • Nails, screws, and other fasteners
  • Level, measuring tape, saw, drill, and other basic tools
  • Optional: Exterior paint or stain for weather protection

Constructing the Foundation and Frame

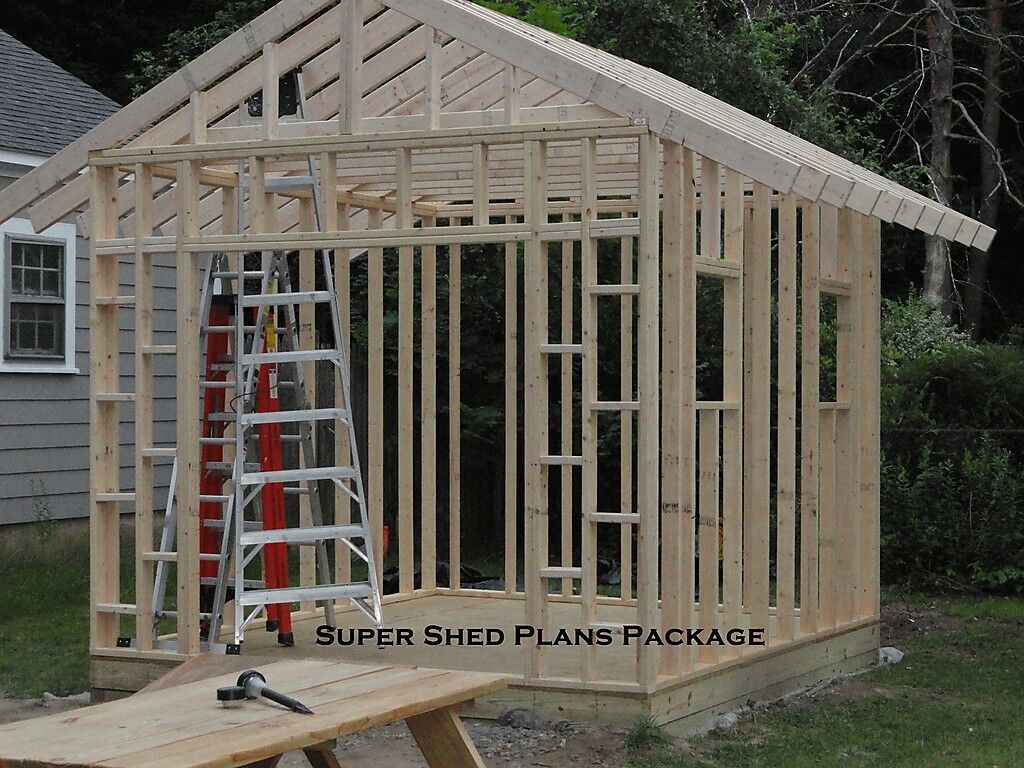
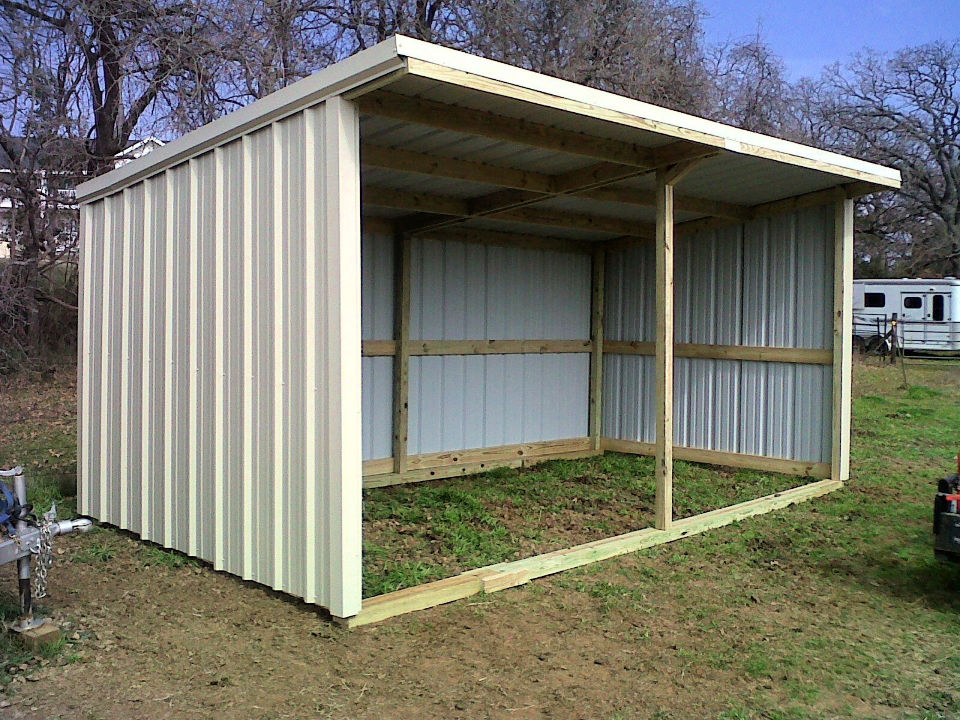
Begin by establishing a solid foundation. For a simple lean-to, a concrete slab or a bed of compacted gravel works well. Alternatively, use pressure-treated lumber for a slightly raised foundation. Next, erect the frame. Securely attach the vertical support posts to the foundation, ensuring they are plumb and level. Then, install horizontal supports to provide stability and strength. Finally, attach the rafters to create the sloping roofline, ensuring even spacing and proper overhang.

Adding Walls and Roofing

Once the frame is complete, it's time to install the wall sheeting. Use plywood or OSB, attaching the sheets securely to the frame. Remember to leave openings for doors and windows if desired. Next, apply the roofing material. Start at the bottom edge of the roof and work your way up, ensuring proper overlap for waterproofing. Secure the roofing with nails or screws, depending on the material you choose. Finally, consider adding a door for convenient access. You can purchase a pre-made door or build your own from lumber.

Finishing Touches and Maintenance

Add the finishing touches to complete your lean-to shed. Consider adding trim around the edges for a more polished look. If desired, apply exterior paint or stain to protect the wood from the elements and enhance its aesthetic appeal. Regular maintenance, such as cleaning and repainting as needed, will extend the life of your shed. Remember to check for any loose screws or nails and tighten them periodically.

Building a lean-to shed is a rewarding project that offers valuable outdoor storage. By following these detailed steps, you'll create a functional and aesthetically pleasing addition to your property. Now go out there and enjoy your new, organized outdoor space!
Share:

Build a Pallet Shed with Recycled Wood: Easy DIY Plans for Budget Builders

Build a Pallet Shed with Recycled Wood: Easy DIY Plans for Budget Builders

Build a Pallet Shed with Recycled Wood: Easy DIY Plans for Budget Builders

Hey there, fellow DIY enthusiasts and budget-conscious builders! Ever dreamed of having a little extra storage space, but the thought of those hefty shed prices made your wallet weep? Well, grab your work gloves and let's build something amazing together â€" a pallet shed! We’re going to show you how to transform discarded pallets into a functional and surprisingly attractive storage solution, all without breaking the bank. This project is perfect for beginners, and it's a great way to practice your DIY skills and show off your eco-friendly side.

Step 1: Gathering Your Materials - The Great Pallet Hunt!

The beauty of this project lies in its resourcefulness. We're talking recycled pallets! Before you even think about grabbing your hammer, the first step is sourcing your materials. This might be the most fun part, depending on your scavenging abilities. Here’s where to look:

  • Local businesses: Many businesses regularly discard pallets. Think grocery stores, construction sites, and even breweries. A friendly ask might yield a treasure trove of wood.
  • Craigslist/Facebook Marketplace: Check online classifieds; people often give away pallets for free or for a very low price.
  • Pallet recycling centers: These centers specialize in repurposing pallets, and they might be willing to sell you some for a reasonable cost.

Important note: When collecting pallets, prioritize those that look sturdy and free from rot or excessive damage. You want pallets that are in good enough shape to be used structurally. Also, be aware of potential hazards like nails and splinters; always wear appropriate safety gear, including gloves and safety glasses.

Step 2: Preparing the Pallets - A Little TLC Goes a Long Way

Once you've gathered your pallets, it's time to get them ready for construction. This is where the real work begins, but don't worry; it's manageable.

Cleaning and Inspection:

Give your pallets a thorough cleaning. Use a wire brush to remove dirt, debris, and loose wood. Inspect each board carefully for any signs of rot, cracks, or damage. If you find any major issues, you might need to replace those boards. This is where having a few extra pallets comes in handy!

Removing Nails and Hardware:

This is crucial for safety and for creating a clean, consistent build. Use a hammer and pry bar to carefully remove any protruding nails, staples, or other hardware. Be meticulous; you don't want to accidentally step on a stray nail later.

Disassembling and Sorting:

Depending on the design of your shed, you might need to disassemble some of your pallets. This allows you to use the individual boards to build a more customized structure. Sort the boards by size and condition, keeping the best ones for the main structure.

Step 3: Designing Your Pallet Shed - Let's Get Creative!

Now for the fun part: designing your shed! The possibilities are nearly endless. You can build a simple, lean-to style shed or a more complex structure with walls and a roof. Consider these factors:

  • Size and Dimensions: How much storage space do you need? Measure your desired footprint carefully.
  • Style: Do you want a rustic look, or something more modern? The arrangement of the pallets will greatly influence the overall aesthetic.
  • Roofing: You'll need a way to cover your shed. Tarps, corrugated metal sheeting, or even reclaimed roofing materials are all viable options.

Sketch out your design on paper. This will help visualize the structure and ensure you have enough materials. Don’t be afraid to get creative and adapt the design based on the size and condition of your pallets.

Step 4: Construction - Putting it All Together!

With your design finalized, it's time to build! This section is where things become more specific to your chosen design. However, here are some general tips:

  • Foundation: You'll likely want a simple base, like a concrete slab, gravel base, or even a wooden platform. This will keep your shed off the ground and protect it from moisture.
  • Framing: Use sturdy boards (possibly from your pallets) to create a frame for your shed’s walls and roof. Ensure the frame is level and square.
  • Wall Construction: Attach the pallet boards to the frame. You can use screws or nails, but screws are generally stronger and easier to work with.
  • Roofing: Once the walls are up, build your roof frame and install your chosen roofing material. Ensure it's securely attached to weatherproof the shed.
  • Door and Windows (Optional): Adding a door and windows enhances functionality and aesthetics. You could repurpose old doors or windows, or build them from your pallet wood.

Remember to take your time, double-check your measurements, and use appropriate fasteners for the job. If you're unsure about any aspect of the construction, don't hesitate to consult online resources or seek advice from experienced DIYers.

Step 5: Finishing Touches - The Finishing Flourish

Once the basic structure is complete, it's time to add some finishing touches. This is where you can really personalize your pallet shed.

  • Sanding: Smooth out any rough edges or splinters with sandpaper to improve the overall look and feel of the shed.
  • Sealing: Apply a wood sealant or paint to protect the wood from the elements and enhance its durability. Choose a sealant that's appropriate for outdoor use.
  • Hardware: Install hinges, handles, and latches for doors and any windows.
  • Personalization: Add your own unique touch, such as hanging plants, adding decorative elements, or creating a personalized sign for the shed.

Commonly Asked Questions

Q: How long does it take to build a pallet shed?

A: The time it takes depends on the size and complexity of your design, as well as your experience level. A simple shed could take a weekend, while a more elaborate structure might take several.

Q: How much does it cost to build a pallet shed?

A: The cost is mainly determined by the roofing material and any additional hardware you buy. If you source your pallets for free or very cheaply, your overall cost can be surprisingly low â€" often less than $100.

Q: Are pallet sheds strong and durable?

A: Yes, if built properly using sturdy pallets and a strong frame. It’s important to select pallets in good condition and to ensure proper construction techniques.

Q: What kind of permits do I need?

A: This depends on your local building codes. Check with your local authorities before starting construction to avoid any potential issues.

Q: Can I use pressure-treated pallets?

A: Generally, it's best to avoid pressure-treated pallets, as the chemicals used in the treatment can be harmful. Stick to untreated pallets whenever possible.

There you have it! Building a pallet shed is a rewarding and surprisingly simple project. So, get out there, find some pallets, and let your creativity run wild. Happy building!

Share:

Step-by-Step DIY Pallet Shed Plans for a Functional and Budget-Friendly Build

Step-by-Step DIY Pallet Shed Plans for a Functional and Budget-Friendly Build

Constructing a Functional and Budget-Friendly Pallet Shed: A Comprehensive DIY Guide

This comprehensive guide details the step-by-step process of constructing a durable and aesthetically pleasing shed utilizing reclaimed pallets. This project prioritizes cost-effectiveness while maintaining structural integrity and functionality. Careful planning and execution are key to achieving a successful outcome.

Phase 1: Planning and Preparation

Before commencing construction, meticulous planning is paramount. This phase involves determining the shed's dimensions, acquiring necessary materials, and preparing the construction site. Underestimating these preparatory steps can lead to significant delays and potential complications later in the project.

1.1 Determining Shed Dimensions and Design

The optimal dimensions of your pallet shed will depend on your specific storage needs and the available space. Consider the following factors:

  • Storage Capacity: Determine the volume of items you intend to store to calculate the required internal space. Account for both floor area and headroom.
  • Site Dimensions: Measure the available space on your property to ensure the shed fits comfortably without encroaching on other areas or obstructing access.
  • Pallet Size and Availability: The dimensions of your shed will be dictated by the size and quantity of reclaimed pallets you have access to. Standard pallets are typically 48" x 40", but variations exist.
  • Building Codes and Regulations: Consult local building codes and regulations before starting construction to ensure compliance.

1.2 Acquiring Materials and Tools

Gathering the necessary materials and tools in advance streamlines the construction process. A comprehensive list should include:

  • Reclaimed Pallets: Inspect pallets thoroughly for damage, ensuring structural soundness. The number required will depend on the shed’s dimensions and design. Treat the wood to prevent rot and insect infestation.
  • Foundation Materials: Options include concrete slabs, gravel bases, or pressure-treated lumber for the base frame. Select a foundation appropriate for your soil conditions.
  • Roofing Materials: Consider options like asphalt shingles, corrugated metal sheeting, or recycled roofing materials. Choose a material that is cost-effective and weather-resistant.
  • Fasteners: Sufficient quantities of galvanized nails, screws, and potentially lag bolts, depending on the complexity of the design.
  • Wood Treatment: Apply a suitable wood preservative and sealant to protect the pallets from moisture and insect damage.
  • Tools: Hammer, saw (circular saw recommended), drill, measuring tape, level, safety glasses, work gloves, crowbar (for dismantling pallets if necessary).

1.3 Site Preparation

Proper site preparation is crucial for a stable and level shed. This includes:

  • Clearing the Area: Remove any debris, vegetation, and rocks from the designated construction site.
  • Leveling the Ground: Ensure the ground is level using a level and shovel. For uneven terrain, consider adding a layer of compacted gravel or creating a level platform.
  • Marking Boundaries: Use string and stakes to mark the perimeter of the shed's foundation.

Phase 2: Foundation and Base Construction

A robust foundation is essential for the long-term stability of the pallet shed. This section outlines the construction of a simple yet effective base.

2.1 Building the Foundation

The foundation type will depend on the chosen materials and ground conditions. For a simple, cost-effective option:

  • Gravel Base: Lay a layer of compacted gravel to create a level base, ensuring proper drainage.
  • Concrete Slab: Pour a concrete slab to provide a solid and durable foundation, although this increases project complexity and cost.
  • Pressure-Treated Lumber Frame: Construct a frame from pressure-treated lumber to elevate the shed off the ground, improving drainage and pest control. Anchor this frame securely to the ground.

2.2 Assembling the Pallet Base

Once the foundation is prepared, the pallet base can be assembled. This involves:

  • Laying the First Layer: Arrange the pallets on the foundation, ensuring they are level and aligned. Secure them to the foundation with appropriate fasteners.
  • Adding Subsequent Layers (if necessary): For taller sheds, additional layers of pallets may be required. Ensure proper alignment and secure fastening between layers.

Phase 3: Wall Construction and Roofing

This phase focuses on constructing the shed's walls and installing the roof. Precision and attention to detail are crucial to ensuring structural integrity and weather resistance.

3.1 Erecting the Walls

The walls can be constructed using additional pallets or by creating a framework using lumber and then attaching the pallets for cladding. This approach allows for greater customization and flexibility in design. Consider using additional vertical supports for structural rigidity, especially for taller sheds.

3.2 Roofing Installation

The roofing system should provide adequate protection from the elements. This involves:

  • Roof Framing: Construct a simple gable roof frame using lumber. Ensure proper rafter spacing and support for the chosen roofing material.
  • Roof Sheathing (Optional): For added strength and weather protection, consider adding plywood sheathing to the roof frame before installing the roofing material.
  • Roofing Material Installation: Install the chosen roofing material according to the manufacturer's instructions, ensuring proper overlap and sealing to prevent leaks.

Phase 4: Finishing Touches and Refinements

The final phase involves adding finishing touches to enhance the shed's aesthetics and functionality.

4.1 Door and Window Installation (Optional)

Installing a door and windows enhances accessibility and ventilation. Cut appropriate openings in the pallet walls and install pre-fabricated or custom-built doors and windows. Ensure proper sealing to prevent drafts and leaks.

4.2 Exterior Finishing

Applying a protective coating to the exterior of the shed will significantly extend its lifespan. Apply a high-quality wood preservative and sealant, following the manufacturer's instructions.

4.3 Interior Finishing (Optional)

Consider adding interior shelving or other organizational features to maximize storage space and functionality. This can include simple shelves constructed from additional pallets or other readily available materials.

Conclusion

Constructing a pallet shed is a rewarding project that combines practicality with cost-effectiveness. By following this comprehensive guide and paying close attention to detail, you can create a functional and aesthetically pleasing storage solution that meets your specific needs. Remember to prioritize safety throughout the construction process and always adhere to local building codes and regulations.

Share:

How to Build a Simple Pallet Shed for Outdoor Storage

How to Build a Simple Pallet Shed for Outdoor Storage

Constructing a Functional Pallet Shed for Outdoor Storage

This comprehensive guide details the process of building a simple yet sturdy pallet shed for outdoor storage. While requiring minimal financial investment, the project necessitates careful planning and execution to ensure structural integrity and longevity. This guide assumes a basic understanding of woodworking techniques and the use of common power tools. Safety precautions should always be prioritized throughout the construction process.

Phase 1: Planning and Material Acquisition

The success of any construction project hinges on meticulous planning. Before commencing work, several crucial steps must be undertaken to ensure a smooth and efficient build.

Site Selection and Preparation

The chosen location should be level, adequately drained, and provide sufficient access for material delivery and future maintenance. Clear the area of any debris, vegetation, or obstructions. Consider the impact of sunlight, wind, and precipitation on the shed's longevity. A slightly elevated position minimizes potential water damage.

Pallet Assessment and Selection

Pallet selection is critical. Prioritize pallets constructed from pressure-treated lumber for enhanced durability and resistance to rot and insect infestation. Inspect each pallet for damage, including broken boards, loose nails, or signs of significant weathering. Discard any pallets exhibiting structural compromise. Aim for pallets of consistent size and quality for ease of assembly. A minimum of 6-8 pallets is generally recommended for a small shed, depending on desired dimensions.

Additional Materials and Tools

Beyond the reclaimed pallets, additional materials are essential for the construction:

  • Concrete blocks or pressure-treated posts: For creating a foundation.
  • Gravel or compacted earth: For improved drainage and stability beneath the foundation.
  • Exterior-grade plywood or sheet metal: For roofing and potentially siding, enhancing weather resistance.
  • Nails and screws: Choose galvanized or stainless steel fasteners for superior longevity.
  • Wood preservative: Treat all wooden components to extend their lifespan.
  • Tar or roofing felt: To waterproof the roofing material.
  • Hinges and a latch: For the shed door.

The necessary tools include:

  • Hammer
  • Screwdriver (power drill highly recommended)
  • Measuring tape
  • Level
  • Saw (circular saw preferred)
  • Safety glasses
  • Work gloves
  • Shovel

Phase 2: Foundation Construction

A stable foundation is paramount for the structural integrity of the pallet shed. A simple and effective foundation can be constructed using either concrete blocks or pressure-treated wooden posts.

Concrete Block Foundation

This method offers excellent stability and drainage. Begin by excavating a shallow trench for the blocks, ensuring a level base. Position the blocks at the desired perimeter, creating a rectangular base. Fill any gaps with gravel or compacted earth for added stability.

Pressure-Treated Post Foundation

This alternative is suitable for softer ground. Dig holes of appropriate depth for the posts, ensuring they are set firmly and plumb (perfectly vertical). Use gravel or concrete for stability. The posts should be spaced according to the dimensions of the pallet structure.

Phase 3: Pallet Assembly and Shed Construction

With the foundation completed, the process of assembling the pallet structure begins. This phase involves careful planning and execution to ensure structural robustness.

Base Construction

Position the selected pallets on the prepared foundation, ensuring they are level and aligned. Use additional wood blocking or shims to compensate for any irregularities in the pallet dimensions. Securely fasten the base pallets together using appropriate nails or screws. Consider reinforcing the corners for enhanced stability.

Wall Construction

The walls of the shed can be constructed by vertically stacking the remaining pallets. Interlock the pallets where possible for added strength. Secure the pallets to each other using nails or screws, paying particular attention to the corner joints. Use additional bracing where necessary to reinforce the structure. The height of the shed will depend on the number of pallets used and personal preference.

Roof Construction

The roof is a critical element, protecting the contents from the elements. The simplest approach is a gable roof using plywood or sheet metal. Cut the chosen material to the appropriate dimensions and attach it securely to the top of the pallet walls. Ensure proper overhang to prevent rainwater damage. Apply tar or roofing felt for waterproofing.

Door Installation

For convenient access, create a door using one or more pallets. Reinforce the chosen pallet section with additional supports. Attach hinges to the door frame and the door itself, ensuring smooth operation. Install a latch or padlock for security.

Phase 4: Finishing Touches and Maintenance

Once the primary construction is complete, several finishing touches and ongoing maintenance steps will enhance the longevity and functionality of the pallet shed.

Weatherproofing

Apply a wood preservative to all exposed wooden surfaces to protect against rot, insect damage, and weathering. Ensure complete coverage, following manufacturer’s instructions. Re-apply the preservative periodically as needed.

Optional Siding

For enhanced aesthetics and weather protection, consider adding exterior-grade plywood or sheet metal siding to the exterior walls. Secure the siding firmly to the pallet structure using appropriate fasteners.

Ongoing Maintenance

Regular inspection is crucial to identify and address any potential issues promptly. Check for signs of damage, loose fasteners, or deterioration. Address any issues promptly to prevent further damage. Periodically clean the shed to remove debris and maintain its functionality.

By following these steps, you can successfully construct a functional and durable pallet shed for your outdoor storage needs. Remember that careful planning, attention to detail, and the use of appropriate materials and techniques are key to a successful project.

Share:

Compact Storage Solutions with These DIY 8x6 Shed Plans

Compact Storage Solutions with These DIY 8x6 Shed Plans

Compact Storage Solutions with These DIY 8x6 Shed Plans

So, you're looking for extra storage space, but you don't have a lot of room, and you're on a budget? I get it! Finding affordable and practical storage solutions can feel like searching for a needle in a haystack. But what if I told you that building your own 8x6 shed could be the perfect answer? It's smaller than a standard shed, meaning it fits even the tightest yards, and building it yourself is a fantastic way to save money. These DIY 8x6 shed plans are designed for the average DIYer, meaning you don't need to be a seasoned carpenter to pull this off. Let's dive into the possibilities!

Why an 8x6 Shed is the Perfect Solution

An 8x6 shed might seem tiny at first glance, but trust me, the space is surprisingly versatile. Think about it: it’s the perfect size for storing those items that are always cluttering up your garage, garden shed, or even your house. Here are a few reasons why an 8x6 shed is such a great option:

Space-Saving Design

The compact size is its biggest selling point! It fits comfortably in small backyards, side yards, or even tucked away in a corner of a larger property. No more tripping over garden tools or lawnmowers in the garage!

Cost-Effective Construction

Building your own shed is significantly cheaper than buying a pre-fabricated one. You'll control the materials and labor costs, saving you a considerable amount of money. This is especially true for the smaller 8x6 shed size, requiring less materials overall.

Customization Options

Unlike pre-built sheds, a DIY project allows for customization. Want extra shelves? A workbench? A specific door placement? You're in charge! You can tailor your 8x6 shed precisely to your needs.

A Sense of Accomplishment

Let's be honest â€" there's a real sense of pride and satisfaction in building something with your own two hands. This is more than just a shed; it's a testament to your DIY skills!

Planning Your 8x6 Shed Project

Before you even think about grabbing a hammer, meticulous planning is crucial. Here’s what you need to consider:

Local Building Regulations

This is extremely important. Check with your local council or homeowner's association about building permits, setback requirements, and any other regulations that might affect your project. You don't want to start building only to find out you need to tear it down!

Choosing Your Materials

The materials you select will affect both the cost and the durability of your shed. Pressure-treated lumber is a popular and affordable choice for its resistance to rot and insect damage. Consider the type of roofing material you want, too. Asphalt shingles are common and relatively inexpensive.

Creating Your Detailed Plans

You'll need detailed plans, including diagrams and measurements. Numerous online resources offer free or paid shed plans. If you lack confidence in your drafting skills, consider purchasing a comprehensive plan set designed specifically for an 8x6 shed. These plans usually provide detailed instructions, cutting lists, and material specifications.

Gathering Your Tools

Ensure you have all the necessary tools before you begin. You'll need basic carpentry tools, including a saw (circular saw or hand saw), hammer, measuring tape, level, drill, screws, nails, and safety gear (safety glasses and gloves are a must!). A post hole digger will also be necessary if you're setting your shed on concrete blocks.

Step-by-Step Construction (Simplified Overview)

Building an 8x6 shed is a manageable project, even for beginners. While a comprehensive guide would be lengthy, here's a simplified overview:

  1. Prepare the Foundation: Level the ground and either pour a concrete slab, use concrete blocks, or create a gravel base.
  2. Construct the Floor: Build a sturdy floor frame using pressure-treated lumber and secure it to the foundation.
  3. Erect the Walls: Assemble the wall frames, ensuring they are square and plumb. Attach the sheathing (plywood or OSB).
  4. Install the Roof: Build the roof trusses or rafters and cover them with roofing felt and your chosen roofing material.
  5. Add Doors and Windows: Install the doors and windows, ensuring they are properly sealed to prevent drafts.
  6. Finish the Exterior: Add any trim or siding to complete the exterior of the shed.
  7. Add Interior Features: Install shelves, a workbench, or any other interior features you desire.

Remember to consult your detailed plans for specific instructions and measurements throughout the process. Take your time, double-check your work, and don't be afraid to ask for help if you get stuck.

Beyond the Basics: Adding Your Personal Touch

Once the basic structure is complete, the fun part begins! Here are a few ideas to personalize your 8x6 shed:

  • Add a lockable door: For security.
  • Install shelving: Maximize storage space.
  • Paint the exterior: Give it a fresh and attractive look.
  • Add a small window for ventilation: Prevent moisture buildup.
  • Install a workbench: Perfect for small projects.
  • Add lighting: Make it easier to use in the evenings.

Commonly Asked Questions

Here are some frequently asked questions about building an 8x6 shed:

Q: How long does it take to build an 8x6 shed?

A: The construction time varies depending on your experience and the complexity of your plans. Expect to spend several weekends, possibly more for a complete beginner.

Q: How much does it cost to build an 8x6 shed?

A: The cost depends heavily on the materials you choose. You can build a basic shed for under $500, but adding features can significantly increase the cost.

Q: Do I need any special skills to build a shed?

A: Basic carpentry skills are helpful, but it's a manageable project for beginners with a little patience and attention to detail. Following detailed plans carefully is key.

Q: What if I make a mistake during construction?

A: Don't panic! Mistakes happen. Carefully review your plans, and if needed, seek advice from more experienced DIYers or online forums. Sometimes, a little extra time and effort can easily correct small errors.

Q: Where can I find 8x6 shed plans?

A: Many online resources offer free or paid shed plans. Search for "8x6 shed plans PDF" or "DIY 8x6 shed blueprints" to find a variety of options.

Building your own 8x6 shed is a rewarding experience. It's a fantastic way to add valuable storage space to your property while saving money and learning new skills. So, grab your tools, follow these tips, and get ready to build your very own compact storage solution!

Share:

6x8 Gable Shed Plans for Stylish and Functional Backyard Storage

6x8 Gable Shed Plans for Stylish and Functional Backyard Storage

6x8 Gable Shed Plans for Stylish and Functional Backyard Storage

Transform your cluttered backyard into an organized oasis with a charming and practical 6x8 gable shed. This versatile size offers ample storage space without overwhelming your landscape. These plans go beyond simple storage; they guide you towards building a stylish addition that complements your home's aesthetic. Forget flimsy, unattractive sheds; this guide empowers you to create a structure that's both functional and a source of pride.

Why Choose a 6x8 Gable Shed?

The 6x8 footprint strikes a perfect balance. It's compact enough to fit comfortably in most backyards, even smaller ones, while offering surprising storage capacity. The gable roof, with its distinctive triangular shape, adds architectural interest and provides superior weather protection compared to a simpler shed roof. This design enhances curb appeal, making your shed a welcome addition rather than an eyesore. Consider the added benefits: increased headroom inside, facilitating easier access and storage of taller items, and improved ventilation to prevent mustiness and protect stored items.

Planning Your 6x8 Gable Shed Project

Material Selection: Choosing Quality Over Cost

Invest in durable, high-quality materials. Pressure-treated lumber resists rot and insects, ensuring a long lifespan for your shed. Consider using composite siding for low-maintenance elegance or opt for traditional wood siding for a more classic look. Choose roofing material that withstands your local climate; asphalt shingles are a popular and cost-effective choice. Remember, quality materials translate to a stronger, more resilient, and ultimately more aesthetically pleasing structure.

Essential Tools and Equipment

Before you begin, gather the necessary tools and equipment. You'll need standard carpentry tools such as a saw (circular saw and hand saw recommended), hammer, measuring tape, level, drill, screwdriver, and safety glasses. Power tools will significantly expedite the process, but meticulous hand-tool work is equally effective. Ensure you have appropriate safety gear and follow all manufacturer's instructions for operating power tools.

Step-by-Step Construction Guide

The construction process involves several key steps:

  1. Laying the Foundation: Prepare a level and stable base, either a concrete slab or compacted gravel. This ensures your shed remains level and prevents settling.
  2. Framing the Walls: Construct the walls using pressure-treated lumber, ensuring accurate measurements and square corners. Use appropriate bracing for stability.
  3. Raising the Walls: Carefully erect the walls, securing them to the foundation. Consider using temporary bracing to maintain stability during construction.
  4. Installing the Roof Trusses: Construct or purchase pre-fabricated roof trusses, and carefully place and secure them. Ensure proper overhang for weather protection.
  5. Sheathing and Roofing: Install sheathing over the roof trusses and then lay your chosen roofing material, ensuring proper overlap and sealing.
  6. Siding Installation: Attach the chosen siding material, ensuring proper alignment and fastening.
  7. Door and Window Installation: Carefully install the door and any windows, ensuring a snug fit and weather sealing.
  8. Finishing Touches: Add trim, paint or stain the exterior, and install any necessary hardware.

Adding Personal Touches: Enhance Your Shed's Style

Don't stop at the basics. Personalize your 6x8 gable shed to reflect your style. Consider adding:

  • A decorative cupola: Add architectural interest to the roofline.
  • Window boxes: Bring in greenery and enhance the aesthetic appeal.
  • A Dutch door: Offer both full and partial access.
  • Custom paint colors: Choose colors that complement your home and landscaping.

Building your own 6x8 gable shed is a rewarding project that offers years of dependable storage. By following these detailed plans and adding your personal touch, you'll create a stylish and functional addition to your backyardâ€"a testament to your craftsmanship and a valuable asset for years to come.

Share:

Download Free 6x8 Shed Plans PDF for Your DIY Project

Download Free 6x8 Shed Plans PDF for Your DIY Project

Download Free 6x8 Shed Plans PDF for Your DIY Project

Hey there, fellow DIY enthusiasts! So you're dreaming of building your own shed, huh? That’s awesome! A 6x8 shed is a perfect size for a ton of uses â€" storage for gardening tools, a small workshop, or even a cozy little potting shed. And the best part? You can totally build one yourself, saving a boatload of money in the process! But where do you start? Well, that's where these free 6x8 shed plans come in handy. Let's dive into everything you need to know to get your project off the ground.

Why Choose a 6x8 Shed?

A 6x8 shed offers the sweet spot between size and practicality. It's big enough to be useful without being so massive that it becomes a monumental undertaking. This size is perfect for:

  • Storing garden tools and equipment
  • Housing lawnmowers, bicycles, and other outdoor gear
  • Creating a small workshop for woodworking or other hobbies
  • Serving as a potting shed for your green thumb adventures
  • Providing extra storage for seasonal items

The compact size also means you won't need an enormous amount of materials, which translates to significant cost savings. It's a manageable project, even for a beginner DIYer, making it a perfect stepping stone into the world of shed construction.

Finding Your Free 6x8 Shed Plans PDF

Now, finding truly *free* and reliable plans can sometimes feel like searching for a needle in a haystack. Many sites offer plans, but they often come with strings attached â€" hidden fees, upsells, or low-quality designs. I'm not going to lead you down that path. Instead, I want to equip you with the knowledge to find reputable resources for yourself.

Here's my advice:

  • Search thoroughly: Use specific keywords like "free 6x8 shed plans PDF," "DIY 6x8 shed blueprints," or "simple 6x8 shed plans." Explore different search engines and forums.
  • Check the source's credibility: Look for sites associated with reputable DIY communities, woodworking blogs, or established home improvement websites. Look for detailed plans, not just simple sketches.
  • Review the plans carefully: Before you start building, make sure the plans are complete and easy to understand. Look for detailed diagrams, cutting lists, and assembly instructions.
  • Don't be afraid to adapt: Remember these are *plans*, not strict blueprints. Feel free to customize them to your specific needs and preferences. Maybe you want a slightly different door placement or window.

Remember, the best free plans will provide you with a detailed material list, clear diagrams showing the construction process, and helpful tips to ensure a successful build. Don't settle for anything less!

Essential Tools and Materials

Building your 6x8 shed will require a few essential tools and materials. Here’s a general list to get you started â€" remember to check your specific plans for a complete list:

Tools:

  • Measuring tape
  • Level
  • Saw (circular saw, hand saw, or miter saw)
  • Drill and drill bits
  • Screwdriver (impact driver is highly recommended)
  • Hammer
  • Shovel (for digging the foundation)
  • Safety glasses and gloves

Materials:

  • Pressure-treated lumber (for the frame and floor)
  • Plywood or OSB (for the walls and roof)
  • Roofing felt or shingles
  • Nails and screws
  • Concrete (for a concrete foundation â€" optional, but recommended)
  • Door and window (size will depend on your plan)
  • Exterior paint or stain (optional)

This is just a starting point. Your specific plans will outline the exact materials you’ll need, and remember to account for extra materials in case of mistakes or unexpected issues. It’s always better to have a little extra than to run short in the middle of your project!

Building Your 6x8 Shed: A Step-by-Step Overview

The exact steps will vary depending on the specific plans you choose, but here's a general overview of the process:

  1. Prepare the Site: Clear the area where you'll be building your shed and level the ground. This is crucial for a stable structure.
  2. Build the Foundation: Depending on your plans and local regulations, you might choose a concrete slab, a gravel base, or even a simple wooden base. A solid foundation is key to your shed's longevity.
  3. Construct the Floor: Build the floor frame and cover it with plywood or OSB. Ensure it's level and strong.
  4. Assemble the Walls: Carefully follow your plans to build the wall frames and attach the sheathing (plywood or OSB).
  5. Erect the Walls: Raise the walls and secure them to the floor frame. Make sure they are plumb and square.
  6. Build the Roof: Construct the roof trusses (if using them) or rafters and attach the roofing material. Proper roofing is essential to protect your shed from the elements.
  7. Install Doors and Windows: Carefully install the doors and windows, ensuring they are properly sealed and weatherproof.
  8. Finish the Exterior: Add any finishing touches, such as painting or staining the exterior.

Remember, safety is paramount throughout the building process. Always wear appropriate safety gear and take your time. If you're unsure about any step, don't hesitate to consult your plans or seek advice from experienced DIYers.

Commonly Asked Questions

Here are some frequently asked questions about building a 6x8 shed:

Q: Do I need a building permit?

A: It depends on your local building codes and regulations. Check with your local authorities to see if a permit is required for a structure of this size.

Q: How long will it take to build?

A: This varies widely depending on your experience and the complexity of the plans. Expect it to take anywhere from a weekend to several weekends for a beginner. Experienced builders can often complete it much faster.

Q: How much will it cost?

A: The cost will depend on the materials you use and your location. You can save significantly compared to buying a pre-built shed, but it's still a worthwhile investment to carefully budget for all materials.

Q: What kind of foundation is best?

A: A concrete slab is generally recommended for stability and longevity, but depending on your soil conditions and budget, a gravel base or even a simple wooden base might suffice.

Q: Can I modify the plans?

A: Absolutely! These are guidelines; you can adapt them to your own needs and preferences. Just make sure any modifications maintain the structural integrity of the shed.

Remember, building your own shed is a rewarding experience. While it requires time and effort, the satisfaction of creating something with your own hands is unparalleled. Good luck with your project, and happy building!

Share:

Popular Posts

Powered by Blogger.

Followers

Social Icons

Recent Posts