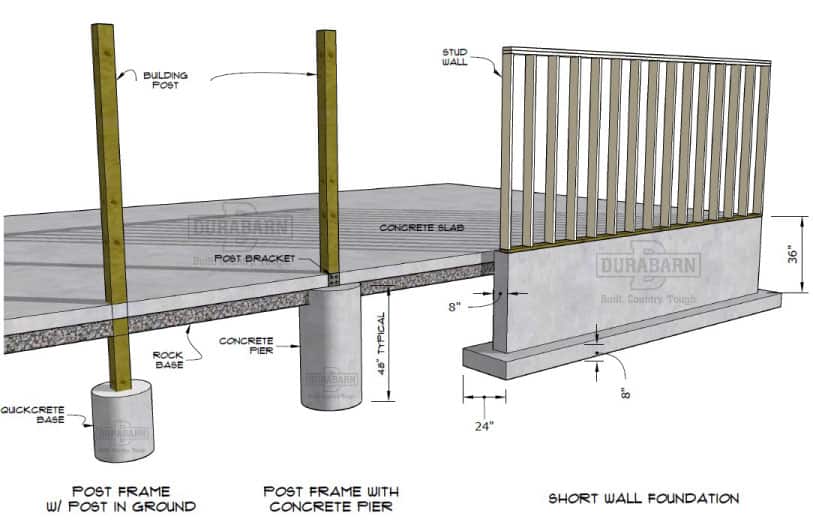
A pole barn, often referred to as a post-frame building, offers a versatile and cost-effective solution for various applications, from workshops and garages to agricultural structures and storage facilities. When opting for a full concrete foundation, you ensure a durable and stable base for your pole barn, maximizing its longevity and structural integrity. This guide provides a comprehensive overview of the construction process, guiding you through each step from planning to completion.
I. Planning and Preparation
A. Design and Permits:
1. Define Your Needs: Determine the intended use of the pole barn, including its size, height, and any specific features required. Consider factors like vehicle access, storage requirements, and future expansion possibilities.
2. Seek Professional Guidance: Consult with a qualified architect or engineer to develop a detailed plan incorporating local building codes and regulations. They will determine the appropriate foundation design, pole sizes, roof structure, and other crucial elements.
3. Obtain Permits: Apply for necessary permits from your local municipality, ensuring compliance with zoning ordinances and building codes. This may involve obtaining a building permit, foundation permit, and potentially a septic permit if the barn is to include plumbing.
B. Site Preparation:
1. Clear the Area: Remove all vegetation, debris, and any existing structures from the chosen site.
2. Level the Ground: Ensure a level surface for the foundation by excavating and filling as necessary. Achieve a smooth and even grade for optimal foundation placement.
3. Utility Connections: Determine the location and requirements for electricity, water, and other utilities. Plan for adequate access points and proper connections for future use.
II. Foundation Construction:
A. Excavation and Formwork:
1. Excavate the Footings: Dig trenches for the foundation footings, ensuring adequate depth and width according to the engineer's specifications. Typically, the depth should be below the frost line in your region.
2. Formwork Construction: Build wooden forms for the foundation walls, ensuring proper alignment and stability. Use plywood or other suitable materials to create smooth and consistent walls.
3. Reinforcement Installation: Insert rebar into the forms, ensuring adequate overlap and spacing as per the design specifications. This reinforcement adds strength and durability to the concrete foundation.
B. Concrete Pouring:
1. Concrete Delivery: Arrange for the delivery of ready-mix concrete directly to the site. Ensure the truck can safely access the location and discharge the concrete into the forms.
2. Pouring the Concrete: Carefully pour the concrete into the forms, using a concrete pump or other suitable method to distribute it evenly.
3. Compacting the Concrete: Vibrate the concrete thoroughly using a vibrating tool or a concrete vibrator to remove air bubbles and ensure optimal compaction.
4. Curing the Concrete: Allow the concrete to cure properly, typically for a minimum of 28 days, to achieve full strength. Maintain adequate moisture levels and protect the concrete from extreme temperatures.
III. Pole Erection and Framing
A. Pole Placement:
1. Mark Pole Locations: Accurately mark the locations for each pole based on the engineered plans. Ensure proper spacing and alignment to support the roof and other structural elements.
2. Concrete Placement: Set the poles into the foundation, ensuring they are plumb and level. Pour concrete around the poles to secure them firmly into the foundation.
3. Pole Support: Consider using additional bracing or support beams for taller or larger pole barns to enhance stability.
B. Framing the Structure:
1. Roof Framing: Install the roof trusses, ensuring proper spacing and alignment. Secure them to the poles using metal connectors or other suitable fasteners.
2. Wall Framing: Construct the walls using horizontal and vertical framing members, attaching them to the poles and roof structure.
3. Door and Window Openings: Create openings for doors and windows based on the design specifications.
IV. Roofing, Siding, and Finishing
A. Roofing Installation:
1. Roof Sheathing: Apply sheathing boards to the roof trusses, creating a solid base for the roofing material.
2. Roofing Installation: Install the chosen roofing material, whether shingles, metal panels, or another type. Ensure proper overlap and sealing to create a weatherproof roof.
3. Gutters and Downspouts: Install gutters and downspouts to manage rainwater runoff, directing it away from the foundation.
B. Siding Installation:
1. Siding Preparation: Prepare the walls for siding installation, including applying housewrap or other moisture-resistant barrier.
2. Siding Installation: Install the chosen siding material, whether wood, vinyl, metal, or other options. Ensure proper alignment and overlap for a professional finish.
3. Window and Door Installation: Install windows and doors, ensuring a tight fit and proper weatherstripping.
C. Finishing Touches:
1. Interior Finishing: Complete the interior finishing, including drywall, insulation, electrical wiring, and any other desired features.
2. Exterior Finishing: Install trim, paint, or other desired finishes to complete the exterior of the pole barn.
V. Final Inspection and Completion
A. Inspection and Approval:
1. Final Inspection: Obtain a final inspection by your local building inspector to confirm compliance with all codes and regulations.
2. Corrections: Address any identified deficiencies before receiving final approval.
B. Project Completion:
1. Cleanup: Clean up the site, removing debris and restoring the area to a presentable condition.
2. Warranty and Maintenance: Review warranties for building materials and schedule regular maintenance to ensure the longevity of your pole barn.
Conclusion
Constructing a pole barn with a full concrete foundation demands meticulous planning, execution, and adherence to building codes. By following this detailed guide, you can successfully undertake this project, resulting in a durable and versatile structure for your specific needs. Remember to prioritize safety, quality, and proper building practices throughout the construction process, ensuring the longevity and functionality of your pole barn for years to come.


No comments:
Post a Comment
Note: Only a member of this blog may post a comment.